| A | B | C | D | E | F | ||
| 1 |
|
1 | |||||
| 2 | 2 | ||||||
| 3 | 3 | ||||||
| 4 | 4 | ||||||
| A | B | C | D | E | F | ||
| Figure 1: The H-Bridge Printed Circuit Board | |||||||
When you get your kit there should be a piece of paper included that lists all of the parts included in the kit, this should be identical to the list at the end of this document unless the board has been revved. You should go through the parts and check off each one to be sure everything is present and identified. The .01uf monolithic capacitors will be marked '103 K' and the 15pf monolithic capacitors are marked '15 J'. It is very important that you don't confuse the two.
DO NOT take either the MOSFETs or the Integrated circuits off their protective static containers until just before you use them. Ideally, you should also keep yourself grounded whenever you handle static sensitive parts. In general it is sufficient to touch something that is grounded before you pick up a part.
Some substitutions that you can make if you are ordering parts:
- 100v Ceramic caps versus 50v Ceramic caps
- 1W zener diodes vs .5W zener diodes.
- Conformal Resistor packages vs dipped epoxy resistor packs.
- Any MOSFET whose Vgs parameter for full enhancement is about 10 volts.
- Other MOSFETs that give higher current capacities.
- 1/8W and/or 1/2W resistors for the 4.7K resistors.
Some of the items in the kit are polarized. This means that they must be installed with the correct orientation. The parts that are polarized are the tantalum capacitors (marked with a + on one lead), the zener diodes (marked with a band on one end), one of the two resistor packs (marked with a dot on the end) and the integrated circuits. When you install the integrated circuit sockets be sure and orient the socket correctly (line up the notch shape with the silkscreen) so that it will guide you when installing the ICs.
The zener diodes and the MOSFETs are heat sensitive. This means that if you hold the soldering iron on them too long you can damage them. My reccommendation is that you count "one one thousand, two one thousand, etc" and if you get to "seven one thousand" and you haven't successfully created the joint you stop. Wait 10 or 20 seconds for the part to cool and try again. This is particularly difficult on the areas where there are really wide traces because the copper foil absorbs the heat.
The following steps will take you through the assembly of the H-bridge board. Read through all of the steps first, then follow them in order when you assemble the board. The assembly steps attempt to build up the board by "levels", that is putting equal height components in at the same time so that the board doesn't rock and tilt on your work surface while building it. On some of the steps you will see a warning sign, this sign indicates that the components being installed in that step must be installed in a specific orientation.
Below is a picture of the unpopulated H-bridge board. The board is bordered by a sequence of letters and numbers. The letters and numbers are used to identify specific locations on the board using a notation of the form B,3. This location would be column B, row 3 on the board. Similarly the location B,1.5 would be column B, between rows 1 and 2. Whereas the location B,2-4 indicates a location in column B that spans rows 2, 3, and 4.
| A | B | C | D | E | F | ||
| 1 |
|
1 | |||||
| 2 | 2 | ||||||
| 3 | 3 | ||||||
| 4 | 4 | ||||||
| A | B | C | D | E | F | ||
| Figure 1: The H-Bridge Printed Circuit Board | |||||||
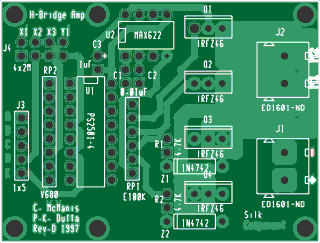
| Locate the H-bridge board, its shown above in figure 1, and install the two IC sockets (8 pin and 16 pin) and the 8 pin SIP socket. Note that the IC sockets have a notch that should line up with the silkscreen notch. Turn the board over and solder them. I find a bit of tape (masking tape) will hold them to the board while I'm flipping it over. | ||
| Locate the two zener diodes and install them. They are located at positions D,3 and D,4 in the image above. Watch the orientation to make sure the band faces to the "left" (away from the screw connectors.) Note that the Zeners may be marked 1N5242 or 1N4742 | ||
| Install the two .01uF capacitors next to the 8 pin socket at location C,1.5. | ||
| Install the 100K resistor pack at location C,2-3. Watch the orientation of the resistor pack. The pin one "dot" or "line" indication should face away from the 8 pin socket which is pointed down in the image above. | ||
| Install the 1uF tantalum at location B, 1.5. Watch the orientation of the tantalum, the plus marked pin goes in the hole marked "+". The positive hole is the upper hole. | ||
| Install the two 4.7K resistors at location C,3 and C,4, These resistors should have their leads bent such that they stand "on end". | ||
| Install the 5 pin header at location A,2-3 and the 8 pin header at location A,1, again using tape can be helpful here. | ||
| Install the two screw terminals at locations E,1.5 and E,3. Be sure to point the wire ports to the outer edge of the board! | ||
| Install the four MOSFETs at locations D,1, D,2, D,3, and D,4, and solder them carefully. Watch the orientation of the MOSFETs. The tabs on the MOSFETs should be facing the top edge of the board. | ||
| Install the MAX622 8 pin chip at location C,1. Watch the orientation pin one on the chip should face the lower left corner of the board. | ||
| Install the P2504-1 chip at location B,2-3 and Watch the orientation. Pin one on the opto-isolator should point to the upper left corner of the board. | ||
| Install either the 330 ohm or 470 ohm resistor pack into the SIP socket at location A,2-4 next to the opto-isolator. |
First, make sure you don't have any solder bridges (places where solder has created a short circuit). Then check that all pins are soldered, and that all solder joints are bright and shiny.
Install four jumpers on the board at J4 (location A,1.5 above) arranged horizontally so that they form a 2 x 2 matrix. The pin labelled X1 should connect to X2, the pin labelled X3 should connect to Y1, and there should be two more jumpers in parallel to these across the bottom of the jumper block.
Apply power to the board using connector J1 at location E,3. I usually connect a short bit of black wire to the upper pin and a short bit of red wire to the lower pin, I can then use clip leads to connect my bench powersupply or a battery. Note that the upper part of the connector is for the negative pin and the lower part of the connector is for the positive connection.
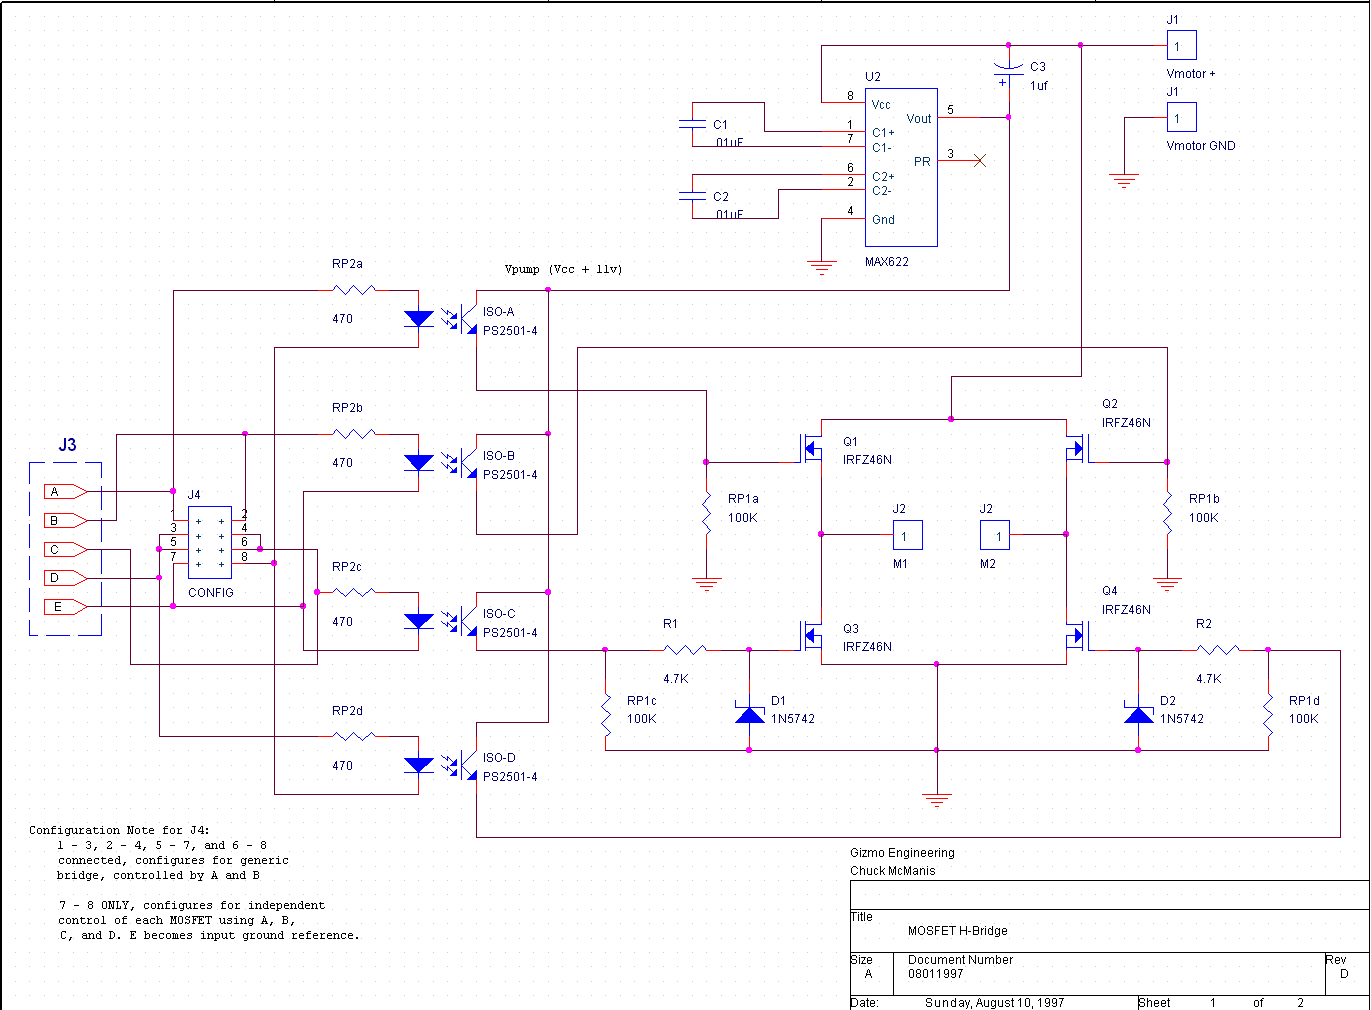
Using your multimeter, measure the voltage at pin 5 of U2 (location C,1). That is the rightmost pin of U2 nearest the edge of the board. The voltage between that pin and the negative power connection at J1 should be about 11 volts higher than the voltage between the positive and negative power connections. If it isn't check to see that C1, C2, and C3 are all soldered in and not shorted, then verify that the resistor pack at RP1 is oriented correctly. Pin 1 of the resistor pack (marked with a line or dot) should be at the bottom of the resistor pack, away from U2. If it still doesn't read correctly remove U1 and see if that fixes it. If so then look for short circuits around pins 8 through 16 of U1.
Once the voltage checks out, connect a small motor to J2. The leads into J2 are not polarized so you don't have to worry about connecting the motor "backwards." Then apply 5 volts to pin A of J3 and connect pin B to ground. The motor should start turning. If it doesn't, measure the voltage on each zener separately (measure one, then measure the other). Take your voltage reading on the banded end (facing left). One of the two should read about 12 volts. If not, verify that the resistor pack RP1 is completely soldered in without short circuits, and that there are no short circuits on RP2 either. Verify that RP2 is between 330 and 470 ohms, and verify that the jumpers are on correctly.
Once the motor is turning, reverse the connection so that there is 5 volts on pin B and pin A is grounded. The motor should run the other way. If it doesn't verify the voltage is appearing on the "other" zener (the one where it didn't appear in the previous step) and that the MOSFETs are all oriented correctly. Verify that the MOSFETs are not getting warm.
Once you have the motor running in both directions then you are done with the H-bridge. If you are only building the bridge, proceed to Using and Customizing the H-bridge below.
The following steps will take you through the assembly of the speed controller board. Read through all of the steps first, then follow them in order when you assemble the board. The assembly steps attempt to build up the board by "levels", that is putting equal height components in at the same time so that the board doesn't rock and tilt on your work surface while building it. On some of the steps you will see a warning sign, this sign indicates that the components being installed in that step must be installed in a specific orientation.
As in the previous section I've included a picture of the unpopulated board below. As this board is significantly smaller than the H-bridge board, it has fewer columns.
| A | B | ||
| 1 | 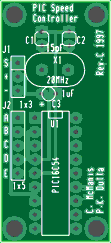 |
1 | |
| 2 | 2 | ||
| 3 | 3 | ||
| 4 | 4 | ||
| A | B | ||
| Figure2: The Speed Controller | |||
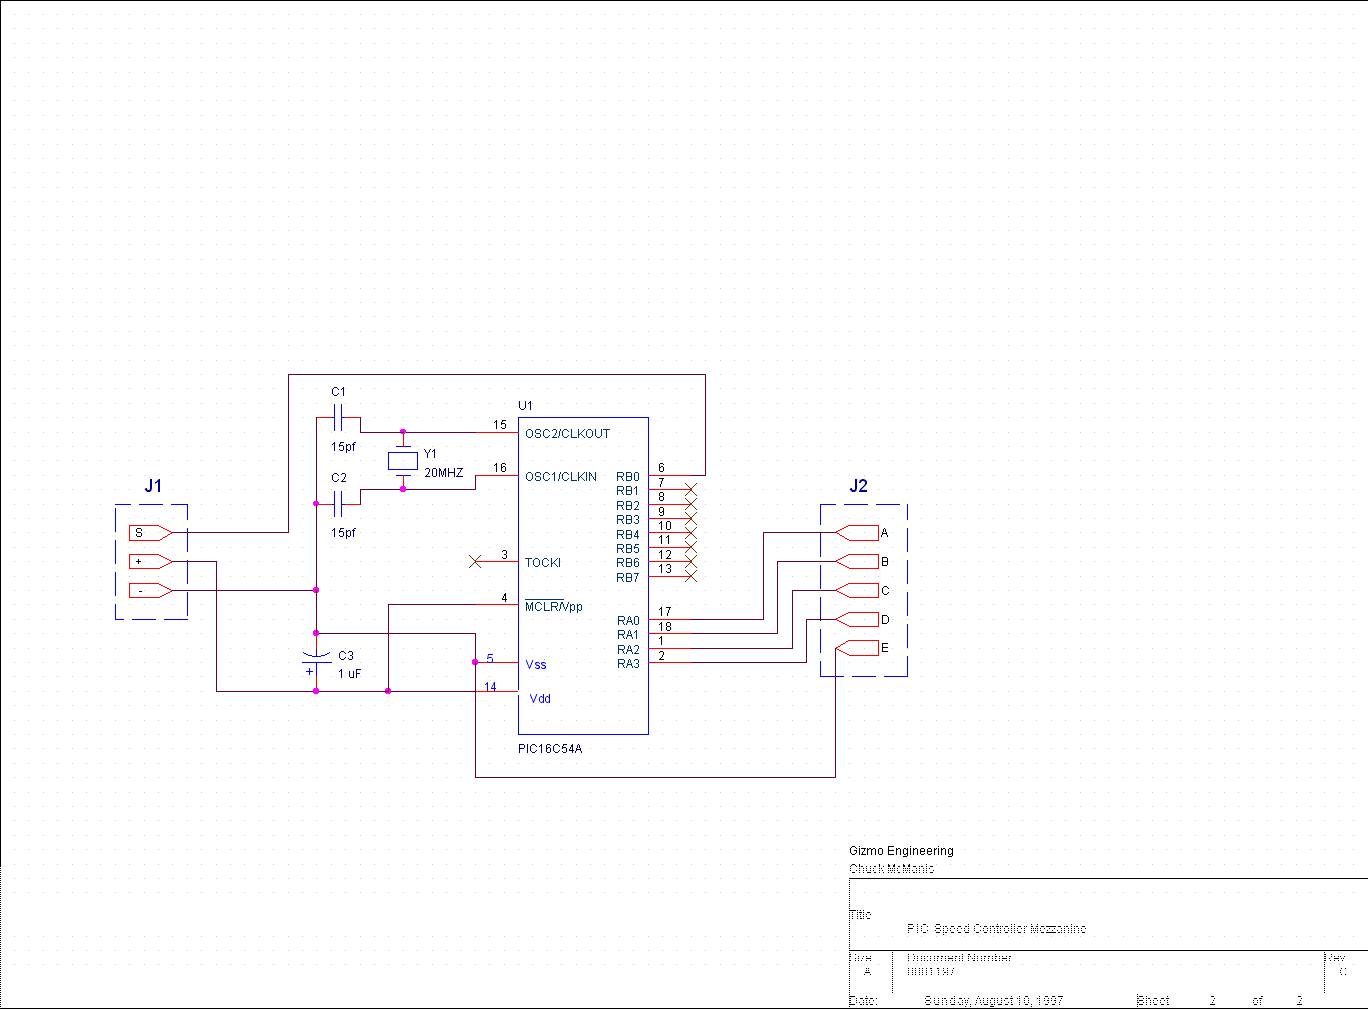
| Locate the PIC controller board. Install the IC socket (18 pin) at location A-B,3-4 and line up the notch with the silkscreen. | ||
| Install the 1uF tantalum at location B,2 and Watch the orientation. The plus pin is marked on the silk screen. | ||
| Install the two 15pf capacitors at location A-B,1 and the 20Mhz crystal at location B,2. The crystal is heat sensitive so don't leave your iron on it too long! | ||
| Mount the 5 pin female header at location A,3 FROM THE BOTTOM of the board, soldering the pins on the top of the board. This is the connector that will go over the five pin header on the H-bridge card. | ||
| Mount the 3 pin header on the board at location A,2. | ||
| Install the PIC chip into the 18 pin socket. Watch the orientation. Pin one of the PIC should point toward the upper left corner of the board. |
Reconfigure the H-bridge board as follows, remove the four jumpers you installed to test it out and replace them with a single jumper, installed vertically, across the two pins whose top pin is labelled Y1. Now carefully attach the speed controller to the H-bridge by connecting the 5 pin header socket labelled J2 on the PIC board to the 5 pin header labelled J3 on the H-bridge. If the board is correctly oriented the four corner holes will be approximately over four mounting holes in the H-bridge board.
Create a three conductor cable using a 3 port Molex "KK" connector. Connect the three wires to a source of Servo pulses such as a BASIC Stamp board or a Handyboard. The connection setup should be as follows:
Pin 1 (labelled S) should be connected to the digital output pin on your servo signal source.
Pin 2 (labelled +) should be connected to 4.5 - 6 volts.
Pin 3 (labelled -) should be connected to ground.
Connect the H-bridge J1 and J2 connectors to power and a motor respectively.
Set the signal source to generate a 'neutral' position (typically 1.5mS or 1500 uS) and measure the voltage at the banded end of the zener diodes on the H-bridge board, both should read approximately 12 volts.
Set the signal source to generate a 'forward' position (typically 1.78 mS or 1780uS). The upper zener should have a 50% duty cycle square wave on it (@ 2Khz) and the lower zener should be at ground. The motor will operate at 50% power.
Set the signal source to generate a 'reverse' position (typically 1.22 mS or 1220 uS). The lower zener should have a 50% duty cycle square wave on it (@ 2Khz) and the upper zener should be at ground (0 volts). The motor will operate in the opposite direction at 50% power.
If the circuit doesn't work look for shorts on the PIC ship, and check to see that the 1 uF tantalum is installed correctly. Verify that RP2 on the H-bridge board is between 330 and 470 ohms. If it still doesn't work, try a different PIC chip.
If you are not using the Speed controller mezzanine board the H-bridge can be used as a simple power amplifier for an existing bridge. Configure the system with two jumpers across X1 - X2, X3 - Y1, and two jumpers below and parallel to the first two jumpers across the lower pins as well.
You can now drive the H-bridge from the pins marked "A" and "B" on J3. Holding pin A high and pulling pin B low will switch the bridge on in one direction, holding pin B high and pulling pin A low will switch the bridge into the other direction. Both A & B high or low will turn off the bridge.
All of the pins on J3 connect through RP2 to the LEDs that are in the NEC opto-isolator. These LEDs nominally need 10 to 15 mA to be fully "on" so the choice of the resistor pack is determined by the signal levels present on J3. Typical values are 330 ohms for 5 volt signals and 680 ohms for 9v signals. As you need to turn on two LEDs to activate the bridge, the port driving the input should be capable of supplying 20 - 30 mA.
Another feature of this bridge is that you can connect it directly to a Handyboard, Miniboard, RugWarrior board, 6.270 board, or Lego brick. Configure the bridge in "test mode" (four jumpers) and then connect pins A and B to the motor connector as if they were the poles of the motor. Hook up the motor and battery to the bridge and any motor commands will be exactly copied by the bridge. Do note the motor driving voltage however and pick RP2 appropriately.
When you go to mount your H-bridge to a chassis it is a good idea to allow for some air flow around the transistors. I've mounted two bridges with their top and bottom edges parallel with good success. If you are running the bridge near its capacity you can add heat sinks to the four FETs for greater current capacity. With the IRFZ46N FETs the bridge should be able to handle 20 Amps without Heatsinks and closer to 40Amps with heat sinks. The goal was to handle most R/C car type chassis without heatsinks. Also be sure there are no conductive materials touching the bottom of the board.
The space between the mezzanine board and the H-bridge is nominally 1/2" so the use of 1/2" spacer between the boards will give a solid mount and prevent vibration. #4 mounting bolts are reccomended as #6 is just a tiny bit too large. You can drill out the mounting holes to accept #6 hardware however without damaging the traces.
You may find that you have to trim about 1/16" off the ends of the 5 pin male header on the h-bridge board to get a good fit, be sure to check before cutting as you can't put it back on later!
	Parts List for the MOSFET Speed Controller Kit
	H-Bridge Parts List

	QTY	Description				Digikey P/N
     	2	1N5242 12V Zener Diode			1N5242BCT-ND
     	2	4.7K 1/4 watt resistor			4.7KQBK-ND
     	1	100K 5 resistor pack			770-61-R100K-ND
     	1	330 ohm 4 resistor pack			770-83-R330-ND
     	2	.01 uF Monolithic Ceramic Capacitor	P4922-ND
     	1	1uF Dipped Tantalum Capacitor		P2105-ND
     	1	8 pin IC socket				ED3108-ND
     	1	16 pin IC socket			ED3116-ND
     	1	8 pin SIP socket			ED7008-ND
     	1	"8 pin .1"" x .1"" header"		S2012-04-ND
     	1	"5 pin .1"" SIP header"			S1012-05-ND
     	2	2 pin screw terminal blocks		ED1601-ND
     	1	NEC 4 channel opto isolator		PS2501-4NEC-ND
     	4	IRFZ46N N-Channel MOSFET		IRFZ46N-ND
     	4	Shunts					SPE1302-ND
     	1	MAX622ACPA charge pump			N/A
     	1	H-BRIDGE PCB				N/A

	Mezzanine Speed Controller Parts List

	Qty	Description
    	1	Microchip PIC 16C54 8-bit uC		PIC16C54-HS/P-ND
     	1	20 Mhz Series Crystal (HC-49 case)	X438-ND
     	2	15pf monolithic ceramic capacitor	P4839-ND
     	1	1uF Dipped Tantalum Capacitor		P2105-ND
     	1	18pin DIP IC socket			ED3118-ND
     	1	5-pin Female board interconnect		*929974-01-36-ND
     	1	3-pin connector 			S1012-03-ND
     	1	Mezzanine PCB				N/A