Module: Electronic Speed Control
|
|
|
| Chuck McManis |
November 2002 |
|
|
|
Introduction
This was the second application of TSG, and electronic speed control. And with this application I come somewhat full circle, having my first major PIC project was also a speed controller. This one however is both better and not as good as that one at the same time.
Its better than the first one in that the software is much less convoluted, this in part to the 16F628's input capture function and better timer/interrupt support. Its not as good as the first one because the first one controlled four power transistors to drive 3 amp motors and this one uses a TI 754410 to control a 1 amp motor. Fortunately, a simple circuit can be used to "beef up" the current capacity to what ever power level you want.
System Specification
The ESC Module shall have as input an R/C servo signal, and shall generate a modulated pulse whose width and polarity are proportional to width of that signal. By default, Futaba timings will be used to control the output, however a mechanism shall be provided to calibrate the timings to a specific transmitter.
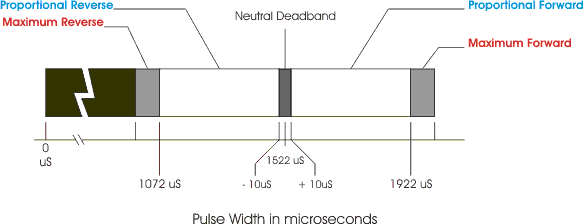
The Futaba timings define "neutral" or "no activation" to be 1522 uSeconds. Widths less than this amount are considered to be a "reverse" command, widths greater than this amount are considered to be "forward" commands. A dead zone of 20 uSeconds is defined to exist around neutral, such that any pulse that is within 10uS of neutral (wider or narrower) shall be considered to be equivalent to a neutral pulse. This specification insures that small variations in the output signal around neutral do not cause motor activation or "jitter."
The relationship between the input and the motor activation is shown below in figure 1.
Figure 1: Relationship of Pulse Input to Motor ActivationThe system uses 16 forward and 16 reverse speeds, created by a activating the H-bridge for n 16ths of a period. When n is 0 the motor is not activated at all, when n is 16 the motor is continually activated. The base PWM frequency is determined primarily by sample clock (1Khz) divided by 16 time slots, or a base frequency of 62.5 Hz. This frequency may be increased however be aware that around 325 Hz it will interfere with Futaba PCM receivers.
System Configuration
For this module, you should hook it up as shown next in Figure 2.
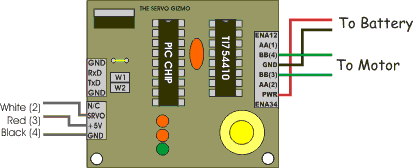
Figure 2. Hooking up TSG as an Electronic Speed ControllerIn the figure, the number in parenthesis reflects the pin number of the connector to which that signal is connected. For all of the connectors, pin 1 is the top most pin. On the motor side the battery is connected between pins 7 and 4, and the motor is connected between pins 3 and 5.
The input voltage should be about 1.2 - 1.4V higher than your motor's voltage (minimum is 6V). This is because there is an inherent voltage drop in the H-bridage chip of about .7 volts on the high side and low side of the bridge resulting in a total voltage drop of roughly 1.4 volts.
The motor current should not exceed 1A for any length of time. The H-bridge chip does have a thermal overload protection circuit however drawing excessive current can overwhelm it and damage the chip. For higher currents (> 750mA) I strongly suggest you consider one of the DIP heat sinks that Digi-key sells (see part number HS179-ND (clip on version) and HS227-ND (glue on version))
Using the ESC
The firmware for this module is written assuming a 4Mhz resonator. These offer the least expensive solution (4Mhz PIC + 4Mhz Resonator). The HEX file is here.
Using this module if fairly straight forward once you have it hooked up. If you're using a BASIC Stamp or some other Microcontroller and you are just adding motor control capability, then setting up the motor control can be done by sending a pulse every 15mS or so to the gizmo. On the BASIC Stamp this means using the PULSOUT command. On a microcontroller with a PWM unit you can often set the period to 15mS and then send continuous updates by setting the pulse width between 6% and 13% in this way the output approximates a servo signal from a receiver.
The built in defaults for servo timings will work for most systems, however to can change those timings to suit yourself by putting the board into "calibration mode." This uses the standard Button UI to set the maximum, minimum, and neutral width pulses. Once set these settings are stored in EEPROM and will be recalled when ever power is applied.
To return the board to the original "factory" defaults, you must install a jumper at W2 when power is not applied, then power up the board. Wait at least 2 seconds and then power off and remove the jumper. The board is now reset to the original configuration.
One option is available, which is dynamic braking or coasting when you send the neutral signal. Dynamic braking means that the motor's leads are electrically shorted together when you are sending the neutral pulse. This has the effect of causing the motor to stop because a turning motor acts like a generator, but when hooked to itself the power it generates is trying to turn the motor the other direction, thus the motor stops. Coasting on the other hand simply stops pulsing the motor and "open circuits" the contacts. This results in the motor coasting until friction and/or an external force cause it to stop. There is no static braking capability, so if you're robot is sitting on an incline you will have to drive the motors to keep the robot from rolling down the hill.
Dynamic braking is selected by installing a jumper at the W1 position. When the jumper is installed braking is applied, when removed the motor is allowed to coast.
System Software
The software (which is available here) is fairly straight forward. The control inputs and definitions are shown below in Table 1.
Signal PIC Pin Direction Description Receiver Servo RB3/CCP Input This is the signal from the R/C Receiver Motor RA2 Output Plugged into one side of the motor Motor RA3 Output Plugged into the other side of the motor Enable 2 RB5 Output This line is pulsed to provide PWM SIG RB6 Output This turns on the SIG LED CAL RB7 Output This turns on the CAL LED Button RB0/INT Input This is true when the button is pressed. Table 1: Signals and Pins used by the Mini-ESC
Rather than go through the source line by line, I'll describe the design of the code as psuedo code and you can read the source at your leisure. Remember that this is a copyrighted work and you are welcome to read from it, learn from it, and use it in your projects. You are not granted the right to re-sell it or derivative works created from it in either in source or object form, nor may you sell chips with it already installed.
As with most modules for the Gizmo, the ESC software relies heavily on the PIC's interrupts. Two interrupt sources are defined, Timer 2 (which provides the 1Khz clock tick) and the CCP pin (which captures the servo input pulses). The BOOLS variable is used to communicate between the main loop and the interrupt service routines.
Interrupt Service Routine:
    If (1mS_tick)  {
	Run the Button State Machine; // May not be "active" but always run it
	if (Count_down == 0) {
	    Command <- Neutral Time-out;
	    BOOLS <- "Timeout"; // Signal main we timed out
	} Else {
	    Count_down--;
	}
    }
    If (rising edge of the pulse) {
	Capture the Leading edge value.
    } else if (falling edge of the pulse) {
	Pulse_Width <- Current Timer value - Leading edge value;
	Count_down <- 20;  // reset the timeout counter.
  	BOOLS <- "Got One";  // Signal main we got a pulse.
    }
The button service routine uses BOOLS to set the "UPDATE" flag if it goes through a calibration sequence. The button state machine also puts the board into "UI Mode" when it notes that the button has been pressed continuously for the required amount of time.
The main body of the code there is simply an endless loop that looks conceptually like this:
Main:
    if (BOOLS == Update) {
	Save new Calibration Data in EEPROM;
    } else if (BOOLS == Timeout) {
	Set the current command to Neutral and execute it;
    } else if (BOOLS == "Got one") {
	If (pulse < neutral)
	    Command <- REVERSE
	Else
	    Command <- FORWARD
	Compute | Pulse - Neutral | ; // Absolute magnitude of pulse width from neutral
	If computed pulse < Guard Band {
	    Command = BRAKE/COAST
	Scaled pulse <= Raw Pulse / Scaling Factor; // Scale it to 0 - 199
	PWM Constant <= Lookup PWM Constant (Scaled Pulse);
	Store Command in memory;
	Store PWM Constant in memory;
    }
Of course there is some other stuff that goes on, for example when a pulse is received the code turns on the "SIG" LED to indicate a signal is being received and the Button UI blinks the "CAL" LED when it is active. However that is basically it.
Availability
The software for this module can be downloaded as a HEX file, or for $5 I can mail you a pre-programmed PIC chip. (note that non-US addresses may require extra postage and handling)