Fun with Casting - Initial Experience
June 20, 2002
I attended a recent SFRSA meeting where one of the members demonstrated some wheels that they had created out of RTV. For those of you who don't know what it is, RTV is a rubber that you can buy at plastics shops (here on the west coast TAP Plastics is a source) that you can cast into shapes by mixing it with a catalyst agent and then pouring into molds. The technology looked promising and it catalyzed an idea I had for a while on building wheels and so I decided to splurge and give it a try. This page is the results of that experiment.
The other thing that I realized is that the way "real" things get made is that a foundry casts them to be "approximately" right, and then a machine finishes them to the final dimension. As I recently acquired a Sherline mill for the purpose of making small robot parts this seemed like it would be a great help in getting most of the way there.
The RTV wheels at the SFRSA meeting were fairly soft (more like tires actually) and that put an upper limit on their diameter. A long time ago I had tried some casting acrylic resin and while it makes nice cast pieces it is brittle and can't be machined at all after you've made your part. Further, the resins I used were rather viscous and so getting any sort of detail was not even an option. Great for making paper weights, not so great for robotics.
My Dad turned me on to some stuff called Alumilite (sometime misspelled as Alumalite) casting plastic. This stuff is a nice light plastic that has excellent strength to weight characteristics. The specs from the Alumilite literature are:
|
Attribute |
Value |
| Ratio by Wt. | 1:1 |
| Viscosity (cps) | 190 |
| Pot life | 2 minutes |
| Specific Gravity | 1.05 |
| Durometer/Shore | 80 D |
| Tensile Strength | 6000 PSI |
| Compression Strength | 10,000 PSI |
| Service Temperature | > 275 ° F |
| Volume Resistivity | 1016 Ohm/cm |
| Dielectric Strength | 200-400 V |
| Shelf Life | 1 yr |
As you can see its pretty cool stuff and it hardens pretty darn rapidly (3 - 5 minutes to cure!)
My desire is to eliminate the problems with finding wheels for "servo" based robots. These are robots like the BOEBot or GrowBot from Parallax. Both of these robots use modified hobby servos for their drive motors.
The "traditional" way to make a wheel out of this is to use the servo horn and to attach it on to an R/C car wheel. You can sometimes screw through the servo horn into the wheel, and sometimes you have to hot glue it. But you're limited to the choices of wheel available and wheels aren't cheap.
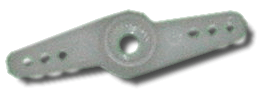
Servos have a sort of splined
end onto which fit servo "horns" or control horns. One such
horn is shown on the right.
The hole in the center is designed to fit over the servo's "axle" and it is toothed so that it gets a good grip on the servo and can't slip.
So my brilliant idea was to create a mold that has the servo horn "built-in"! To do that takes a bit of planning, but once done you should be able to make any kind of wheel you want.
I purchased the "Super Casting Kit" from San Antonio Hobbies in Mtn View. At $70 it was expensive but it looks like I can make probably 100 - 200 wheels out of it. Since a pair of wheel hubs is something like $5, that's $250 worth of wheels, and the ones I make will be exactly what I want! Also the wheels in the hobby shop need tires and that can easily take you up to $20 for a pair of wheels. Since the Super Casting Kit includes some RTV rubber you can make a wheel and tire if you choose.
Step 1 - Thinking Inside Out
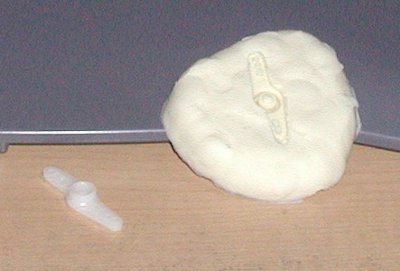
In order for this to work you have to think "inside out" or more specifically the mold will be the "outside" of what your casting so to create it you need the "inside." I took the casting kit and a servo (with horn) to one of the HBRC SiG meetings.
I removed the horn (shown above) and put it on some of the clay that came with the kit. Then I made a "bowl" out of the clay, mixed up some RTV and catalyst and poured it over the servo horn.
That took 12 hrs to completely cure, but when I pulled it out of the clay, and then pulled the servo horn out of the RTV, I had a mold with a servo horn in it.
 The next step was to take that and to create another mold that I could make
into a wheel.
The next step was to take that and to create another mold that I could make
into a wheel.
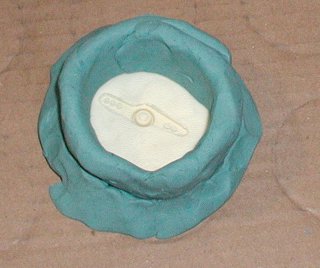
I used the clay bowl because I didn't have anything else at the SiG meeting with which to make a mold holder. The next one I do will use a flat surface and clay "damn" around it to provide a very flat outcome. As you can see in the picture above it is "bumpy" around the servo horn imprint.
The cool thing is that the servo horn is exactly reproduced in the RTV, except in negative.
Step 2 - Combining the Mold
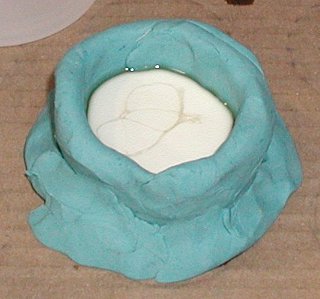
Now that I had a surface with a servo horn imprint in it, I wanted to try making a wheel. As this isn't going to be a "real" wheel given the bumpyness I used the clay again this time to create a bowl with a bottom that was the servo.
As you can see in the picture I've built up the edges to create a bowl and the bottom of the bowl is the latex mold. When I re-do this part of it the mold will be a uniformly flat sheet (roughly 4" x 4") with the servo horn in the middle, and the "wheel" form will be a circular ring of plastic or aluminum that I will center as closely as I can on the servo horn.
Step 3 - Pouring the Wheel and Extracting It
The third step is to fill the mold bowl with Alumilite. Start by mixing up four tablespoons worth (two tbs of parts A & B respectively). This stuff sets really quickly so I mix it for 10 - 15 seconds and then pour it into the bowl.
As you can see, the mold is filled with the Alumilite which quickly turns an off-white/ivory color. That hardens in 3 to 5 minutes and gets pretty hot in the process. Once it hardened I removed the wheel blank.
![]()
![]()
As you can see from the picture above its not very round yet. However the interesting bit is the servo horn impression. Darn if it doesn't look like the original servo horn is growing right out of the side of that wheel! And in the picture on the right you can see the wheel blank put onto the servo. It fits perfectly of course (its exactly like the servo horn). The difference is that the molded horn is part of the wheel rather than being attached to it.
Step 4 - Final Finishing Work
If this were a "keeper" then the next step would be to clamp this to a lathe and turn to the exact dimension I required. Its hard to see because of the camera but the mold of the servo horn leaves a dimple where the center hole of the horn is. That provides a registration point for drilling through the wheel for a mounting screw. It also facilitates chucking the piece on a lathe or a mill.
I'll have to update these pages once I've redone the horn "base" mold and run a few "real" wheels through it. Until then this should help get you started!
The Alumilite stuff will be a great way to create new parts for light weight robots. It is durable and easy to work with. I've already started thinking about a walking robot that has custom linkages cast to my exact requirements with a servo "connector" built into their ends. The ability to make your own plastic parts should be part of every roboticist's bag of tricks.
--Chuck McManis