 |
 |
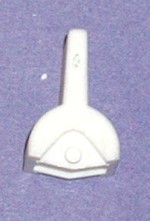
Side View |
Bottom View |
Figure 1: Two views of the source material. |
|
Making Switch Handles
October 1, 2003
Wheels are one thing, what about making something a bit more complicated?
Bob Armstrong is making a PDP-8 thing. Its really cool. Since I too am a fan of older computers, I offered to help in what ever way I could. Well the switches he found for the front panel all have white switch handles. We needed some burnt orange and yellow ones. Seemed like something I could do with casting plastic.
This is the target:
|
|
|
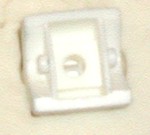
Side View |
Bottom View |
Figure 1: Two views of the source material. |
|
You can't tell by the image, but the switch fits entirely within the outline of a US Quarter, so its not very big. The good news is that Alumilite picks up detail but the small space leads to some interesting challenges.
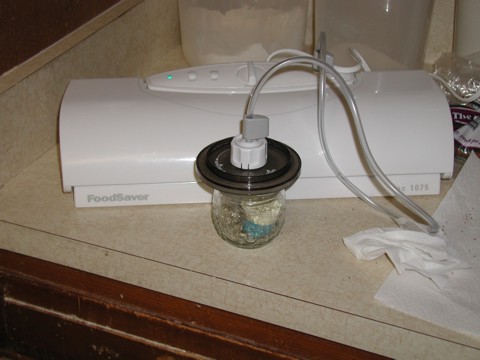
I started by trying to create a mold for the switch handles. Unlike the wheels, this could not be a pour mold. Instead it had to be something that had two parts. The other thing I discovered was that you really do want to pull a vacuum on your molds when they are small and complicated. Here is a picture of making the bottom half:
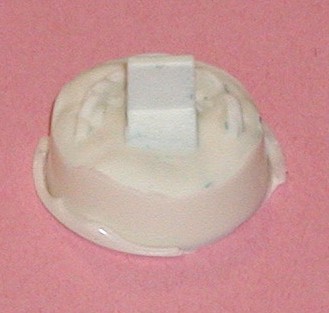
This mold shows the "paddle" of the switch sticking out of the RTV. The theory was that I could bend the RTV to release the two "nubs" that the switch uses to stay attached to the switch body.
 I
pulled a vacuum on this mold by using a
FoodSaver machine, they are sold here at
CostCo (and
CostCo Online) for about $140. The good news is that you're spouse will
love that you gave them this surprise gift that keeps leftovers fresh, lets
you can your own foods, and generally helps the environment. Just remember to
save one of the canisters for yourself :-). The above mold was vacuumed by
using the 'lid saver' attachment (didn't have the canister yet) and is shown
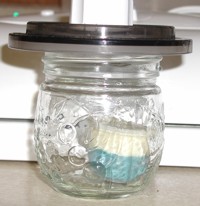
on the right, A larger picture with the whole setup is shown below.
Basically this vacuum pump will pull a vacuum in any bottle or jar (and there
are special bags as well but I don't use those.)
I
pulled a vacuum on this mold by using a
FoodSaver machine, they are sold here at
CostCo (and
CostCo Online) for about $140. The good news is that you're spouse will
love that you gave them this surprise gift that keeps leftovers fresh, lets
you can your own foods, and generally helps the environment. Just remember to
save one of the canisters for yourself :-). The above mold was vacuumed by
using the 'lid saver' attachment (didn't have the canister yet) and is shown
on the right, A larger picture with the whole setup is shown below.
Basically this vacuum pump will pull a vacuum in any bottle or jar (and there
are special bags as well but I don't use those.)
The goal of course is to get all of the air bubbles out of the RTV before it sets. This is especially important when you're making a mold that has a lot of detail and sharp edges. I wanted the "nubs" on the switch to come through crisply as that way they would work in the switches they were intended for.
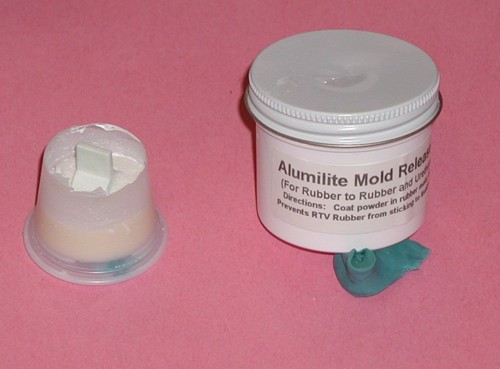
Once the bottom was cast, it was time to cast the top. This is where the first challenge comes in. If you're using RTV in your mold and more RTV for the top, you have to keep the two from sticking together. That is done with "mold release" powder. (basically its just talcum powder). I prepped the mold with mold release and was ready to do the top half.
The trick was that the top half would have the top edge of the paddle right at the surface. After the mold was created I would use the rectangular hole as a fill hole for the mold.
If you have a two part mold you have to fill it somehow, and the resulting fill "appendage" where the plastic hardens in the fill hole is called the "sprue." I thought I would avoid a sprue by using the end of the switch as the fill hole. So more RTV is mixed, the top is filled, and put under vacuum once again.
I don't have pictures but the resulting two part mold was nearly impossible to pull apart. That meant I had not used enough mold release. I did get them apart and another problem became obvious, the vacuum causes the RTV to surge briefly as the air is being purged, and that caused it to overflow my mold holder, then when the RTV sank back down the switch end was sticking out. So much for using it as a sprueless mold! Not to be completely dissuaded, and since the casting part is the "fast" part, I used the mold I had made and cast a switch handle with it, the results are below.
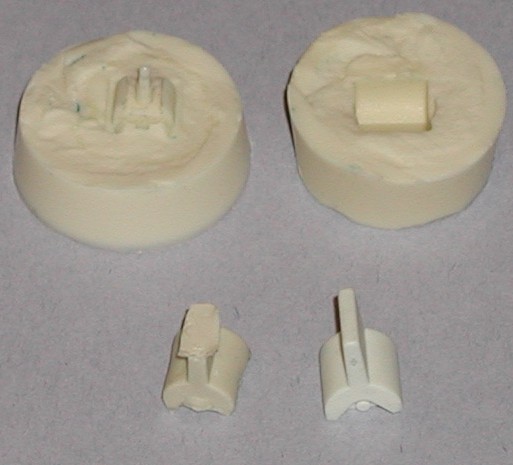
The "rough" surface of the two mold halves shows the problem with the mold release, the RTV had bonded with itself and so the separation was not clean. The resulting cast switch captured the body "form" really well, and the interior is quite good too, but the nubs on the sides of the switch did not do well at all. In fact the portion of the mold that should have molded them ripped off during the separation process.
This mold is the most challenging casting thing I've done so far. Pour molds are childs play by comparison. The next attempt is going to try creating a displacement mold. In that version the mold will not have a sprue hole, rather the switch impression will be filled with plastic and the top half will insert a mold that will displace the plastic that makes up the interior. Given the setting speed of this stuff I expect it to be a challenge.
--Chuck McManis