Weapons System Module
| By: Chuck McManis |
Sept 17, 2002 |
Introduction
This was the first application of the TSG. Members of my BattleBots team had pneumatic valves that were activated by a solenoid in the valve and we needed a way to activate those valves with the radio. Since a solenoid looks a lot like a relay, my thought was take a PIC, have it monitor the R/C signal, and when it saw the signal you wanted activate the relay. The Weapons Systems Module concept was born.
Description
The Weapons Systems Module monitors the R/C servo signal and at greater than 75% past neutral it activates Relay #1, at less than 66% of servo extension it releases Relay #1, then at greater than 75% negative extension it activates Relay #2 and at less than 66% negative extension it deactivates relay #2.
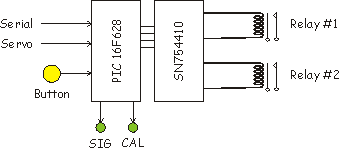
It uses the button to initiate a calibration sequence that sets up neutral, maximum positive extension and maximum negative extension. From this setup it derives the 75% and 66% values. A simple system diagram is shown below.
WSM is a PIC based device that monitors either an R/C pulse or a serial input and translates that into activation or deactivation of some combination of four outputs. These outputs are typically connected to relays or solenoids.
There are two components, the PIC and the driver chip. Given the nature of this board it can be used in a variety of ways. Examples are a small stepper motor driver, a small DC motor controller, and of course as a weapons controller. The basic architecture is shown in the figure below. What the board does is entirely dependent on the firmware it has loaded.
As you can see the system is quite simple. It responds to one of three inputs, the button, the servo, or the serial port (and it can send to the serial port as well). And the response is to either light up LEDs (SIG and CAL) or to activate or deactivate various outputs.
You can think of it as a PIC with four outputs that the drive or sink up to 1 amp of current at 6 to 36V. (Limited by the power dissipation of the driver chip however!) Further, those outputs can be modulated by the PIC using a software PWM loop to give some measure of variability.
As it has been designed initially to deal with R/C receivers, the SIG and CAL LEDs are used in that mode. Specifically the SIG LED lights whenever a pulse is received by the servo pin. When the button is pressed and held the CAL light comes on. During this period the servo inputs are measured for width and the longest is considered the "max" the shortest the "min" and the last pulse width seen before the button was pushed a second time is considered "neutral." These measurements are used to scale the pulse internally to a value between 0 and 100%.
Control Assignments
These are the control assignments for the PIC chip on the board. Note that RA5 which is also reset serves double duty as an input configuration jumper. During debugging it is useful as a reset input.
PIC Pin Controls Description RA0 1A Controls Output driver 1A RA1 2A Controls Output driver 2A RA2 3A Controls Output driver 3A RA3 4A Controls Output driver 4A RA4 Jumper 1 Configuration Jumper 1 RA5 Reset/ Jumper 2 Configuration Jumper 2 (reset during debug) RB0 Button Calibration button (active low) RB1 Serial I/O Serial port RB2 Serial I/O Serial port RB3 Servo Input Input from R/C Receiver RB4 1,2 Enable Enable drivers 1 and 2 RB5 3,4 Enable Enable drivers 3 and 4 RB6 SIG LED Controls the signal LED RB7 CAL LED Controls the calibration LED The other jumper on the board allows power from the R/C receiver battery to power the board. This option is only recommended if you will be using the FET board to handle larger loads.
![]()