Module: Weapons Control
|
|
|
| Chuck McManis |
Summer 2002 |
|
|
|
Introduction
This was the first application of the TSG. Members of my BattleBots team had pneumatic valves that were activated by a solenoid in the valve and we needed a way to activate those valves with the radio. Since a solenoid looks a lot like a relay, my thought was take a PIC, have it monitor the R/C signal, and when it saw the signal you wanted activate the relay. That thought begat The Weapons Systems Module which we used during BattleBots 6.0 on both "Little Hater" and on "Double Trouble." This page describes re-implementing that controller as a "personality" module for the TSG.
System Specification
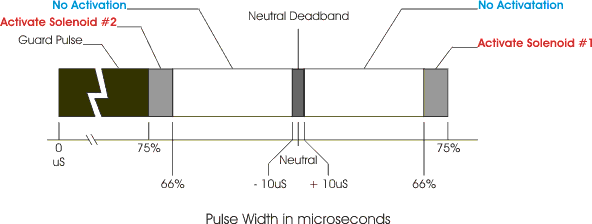
The Weapons Module shall have as input an R/C servo signal, and shall activate either of two solenoids based on that input. When the input signal is at 75% of its full extension, Solenoid #1 shall activate, when that signal drops below 66% of its full extension Solenoid #1 shall deactivate. When the servo signal exceeds 75% of its full retraction, Solenoid #2 shall activate. And at 66% of full retraction Solenoid #2 shall deactivate. If a signal that is less than 66% of full extension or retraction is received, or no signal is received for 20 mS, both solenoids shall be deactivated.
The relationship between the input and the solenoid activation is shown in Figure 1 below.
Figure 1: Relationship of Pulse Input to Solenoid ActivationAs you can see from the figure there is a small deadband around neutral. This is not strictly necessary however it has been my experience that for those applications that require a neutral in their operation, it is better to make the value for neutral a bit 'fuzzy'. This insures that sticks on R/C transmitters that don't go back to their exact location still show up as neutral on the controller. My Futaba 3PJ-Super can be off by up to 5 uS on the wheel when you just let it go and it attempts to self center.
The other aspect that isn't captured well in the figure is that the solenoids activate when you go to 75% but only de-activate when you drop below 66%. This is called hysteresis. Hysteresis prevents oscillations right around the activation point and de-activation point from occurring. Imagine that your transmitter was putting out exactly 75%. Then if it dipped slightly below and up again, and there was no hysteresis, then the solenoid would turn on-off-on-off rapidly. Further when its turning off you don't want it to suddenly snap back on. By setting the activation and deactivation points as I have the solenoid responds reliably to the input signal, even in noisy environments.
System Configuration
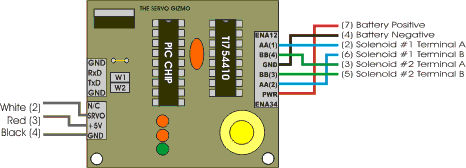
For this module, you should hook it up as shown next in Figure 2.
Figure 2. Hooking up the TSG as a Weapons ModuleIn the figure, the number in parenthesis reflects the pin number of the connector to which that signal is connected. For all of the connectors, pin 1 is the top most pin.
The input voltage should be the voltage that your solenoids need to activate (or if you are using relays, the relay coil voltage). Typically this will be 6, 12, or 24 volts DC. If you are using 24 volts DC and not using a mounting bracket, then I strongly recommend you put a heat sink on the voltage regulator as it will get fairly hot and the last thing you want is the controller resetting in the middle of the action! Remember that there is an upper limit of 36 volts on the regulator and the TI chip so if you are using a 48V system then you can't use this board directly. Instead you will need to switch a relay using this board and have the relay switch the 48V to the system.
Final note on the configuration, if the jumper above J1 & J2 is installed the board will provide 5V to power your receiver, if you don't install that jumper then this pin is not connected to the circuit.
System Software
The software (which is of course the real magic for these things) is fairly straight forward. The control inputs and definitions are shown below in Table 1.
Signal PIC Pin Direction Description Receiver Servo RB3/CCP Input This is the signal from the R/C Receiver Solenoid #1 RA0 Output This is half the signal to the #1 solenoid. Solenoid #1 RA1 Output This is the other half, when these two signals are in opposition the solenoid activates. Solenoid #2 RA2 Output This is half the signal to the #2 solenoid. Solenoid #2 RA3 Output This is the other half of the signal to the #2 solenoid, when these two signals are in opposition the solenoid activates. Enable 1 RB4 Output This enables Solenoid #1 Enable 2 RB5 Output This enables Solenoid #2 SIG RB6 Output This turns on the SIG LED CAL RB7 Output This turns on the CAL LED Button RB0/INT Input This is true when the button is pressed. Table 1: Signals and Pins used by the Weapons Module
The core bit of software consists of two interrupt driven event chains, the first is the input pulse measurement function, the second is a 1Khz clock tick that allows the software to know if 20 "ticks" (or 20 mS) has passed without receiving a signal. The pseudo code for this goes something like:
OnInterrupt:
    If (1mS_tick)  {
	if (Count_down == 0) {
	    Command <- All Solenoids Off;
	} Else {
	    Count_down--;
	}
    }
    If (pulse) {
	Pulse <- Width;
	Count_down <- 20;
  	NewPulse <- True;
    }
Then in the main body of the code there is simply a loop that looks conceptually like this:
Main:
    if (NewPulse) {
	NewPulse <- False;
	If (Pulse > -66% and Pulse < +66%)
	    Command <- All Solenoids Off
	Else If (Pulse > +75%)
	    Command <- Solenoid #1 Activated
	Else If (Pulse < -75%)
	    Command <- Solenoid #2 Activated
    }
Of course there is some other stuff that goes on, for example when a pulse is received the code turns on the "SIG" LED to indicate a signal is being received.
Calibration
Another feature of the software is to calibrate the trip points. In the main loop, the software monitors the state of the button. If the button is pressed for more than 500 "ticks" (which is one half second) then a calibration loop is entered. The calibration loop doesn't worry about the commands and instead monitors the width of the pulses being measured. It keeps track of the longest and narrowest pulse. When the button is pressed again, the loop takes the last measured pulse as "neutral."
With the three measured widths; max, min, and neutral, the 75% and 66% points of max and min are computed. These are stored in EEPROM so that they survive power down modes. Now the module can respond correctly to the input from the current transmitter. In this way the weapons module can be matched to any channel of the transmitter, even one with a very limited amount of "throw."
Availability
The software for this module can be downloaded as a HEX file, or for $5 I can mail you a pre-programmed PIC chip. (note that non-US addresses may require extra postage and handling)