Layout Considerations
Generally this circuit is fairly free of layout restrictions, however there are some things that you can do to make your life easier. A sample layout is shown below.
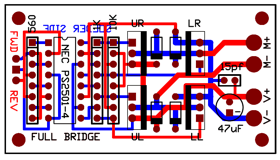
One of the things to note is that the transistors are arranged "back to back" with their tabs facing each other. In my layout I have spaced them 3/8" apart which allows me to put a piece of 1" x 3/8" x copper bar stock down the middle and with #4-40 machine bolts to secure it. A 1 - 1/2" piece of this stock weighs about 3 oz. This basically doubles to current capacity of the bridge, and if you then bolt the copper bar to a metal enclosure you can triple the capacity to a full 6 amps continuous duty. Further, the two left transistors are the "upper" source transistors and the two right transistors are the lower "sink" transistors. That means that any thermal solution will have heat being injected from diagonal corners which further maximizes the benefit by spreading out the heat injection. The point here is to think about whether or not you are going to put heat sinks on the transistors and lay them out accordingly.
If you decide you would actually like to build a few PCBs for your club or for a class or something, there is a ZIP file available that has everything you need to order them from APCircuits. As of this writing (December '03) it will cost you about $100 to have 14 boards made up (there is a $66 dollar "hit" just to set up the board, then each board is $2.44 after that. However, 14 boards for $100 is about $7 each net so you're looking at about a $12 per bridge cost). The layout in the zip file is very slightly different than the first run, I added more room for the over-voltage snubber and added a place to put a .01uf capacitor across the motor leads (cuts down on brush noise).
Alternatively you can build this bridge on a piece of perfboard and just solder it together. Be sure and use at least 18 ga wire on the legs of the transistors.
Microprocessor Control
To use this h-bridge with a microprocessor, you must connect the three control lines to output pins on the microprocessor. Using the BasicStamp II as an example, consider the following hookup diagram.

As you can see three pins from the Basic Stamp are connected to each H-bridge board. In this example they are P0, P1, and P2 to the board controlling the left motor and P4, P5, and P6 to the board controlling the right motor. One of the advantages of using three pins that are both right next to each other, and in the same group of four bits (called nybbles) is that you can use a single variable (one of OUTA, OUTB, OUTC, or OUTD) to write to four pins at once.
This is really only important on chips like the BASIC Stamp where their can be a millisecond or more between the execution of one instruction and the next. By connecting them this way you can cause both motors to start turning with a single instruction such as this assignment:
OUTL = $33
Whereas if you did two instructions :
OUTA = $03
OUTB = $03
You would find that the left motor started turning first, then the right motor. So on a robot that steered with two motors the motor would make a slight turn to the right, then go straight. If you turned them off in the same sequence you would find that the robot corrected its heading back to the original heading but would not have traveled "straight" ahead. For systems that use gear motors such as the 12V Brevel motors or the Globe motors, this won't be a noticeable problem, but higher performance motors will definitely suffer.
Alternatively you could use something like my ServoGizmo project to drive one or two of these boards. The AntWeight ESC code could be easily modified to drive this bridge circuit rather than the 754410, however you could even drive two of these at the same time with some additional code. When the 754410 is not mounted on the Gizmo board you get 6 outputs from the PIC. If I have time I'll write a dual motor control with serial input so that you could connect the Gizmo to just one pin of the BASIC stamp and send it serial commands to control two motors.
The easiest way to use PWM on the motor is to start with the direction and enable bits "high" or at a logic 1 value. This turns on the high side (source) transistor and leaves the sink side transistor off. You can then send "low" pulses out the ENA* line to turn the motor on and off. This would allow you to use a single 'PWM' output, such as the one that is available on the PIC16F628, to control the PWM duty cycle in hardware while the PIC managed other aspects of controlling the motor. The most common use would be to provide encoder feedback into the PIC that would allow a simple PID algorithm to be implemented. With two bits of encoder input, three bits of motor control, and two bits for serial I/O the 16F628 would be well engaged.
Summary
The previous pages have gone through the design of simple H-bridge using bipolar junction transistors. If you read through this tutorial and build the H-bridge, you will be able to use this information in many future robots. The H-bridge that is presented is well suited to a wide variety of hobby motors and because you should understand it completely, it should be easily repaired should something fail. The next step in building H-bridges is to build them out of MOSFETs. This is a rather more complicated endeavor and the topic of the next section in the H-bridge Theory and Practice tutorial.
Next: Building a FET H-bridge
| BJT Bridge Analysis | ||